Monday, July 11, 2016

Finally Figured Out How to Make an FBA In a Dior Dart!

I knew I had seen how to alter a Dior dart somewhere, but I combed my fitting books, and I have a lot of them!   Could not find it anywhere.  Finally this post from from Cenetta of The Mahogany Stylist on how to make an fba with the new or newish, Y dart made me remember that I hadn't looked in Palmer/Pletsch's Full Busted DVD, which is where I found it.  I've also been playing around with moving darts and dividing my very large dart into multiple darts. It's fun and kind of empowering not to be tied to that very large dart my DD bust needs.


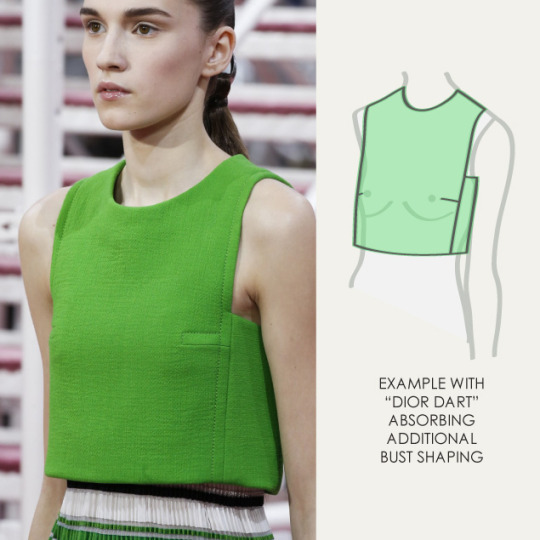
In case you don't know what a Dior dart is, it's a short dart from a side panel. Burda often uses them and Hot Patterns used it for their new Montpelier dress which I am making.


As you can see, this dress has a side panel which extends as the under sleeve for this dolman sleeve, if that's what you call this cut on sleeve?  But, regardless It has a side panel with a dart in the front panel. The side panel is far from the bust apex.  A princess seam would run over the apex or close to the apex of the bust.  Here is an example of how Dior used it in the 2015 Spring collection. 


I love this example with the top stitching.  I turned my single Dior dart into two to make them smaller.  Jennifer Lawrence had a dress on  that had three small darts from a side panel that was very attractive too. It really molded the bust beautifully.

My alteration of the Montpelier dress looks like this, showing how  I've divided the dart into two, but I am going to make two front versions one with one dart and one with two as it is here to see which I like better.  I also shortened the dress since this is a very awkward length on me, to just below the knee.

Here's  the Y dart I made. Because I have a low bust I made a smaller Y section, about 1/2" with the remainder, about 1" in the side dart, because it widens the upper chest  where I am not wide.  The sleeve gets cut off in this type of sleeve so that you can make the second part of the fba like you would in a regular armscye. Then it gets re attached and any opening filled in with paper.  This is smaller than the usual fba I make.  But, when I tissue fit it this is the width I needed.  It remains to be seen if this sews up well in a muslin. 


Sunday, July 3, 2016

Why Do I Only Seem to Finish Winter Coats at the End of the Season?

Seriously, I never seem to finish a coat at the beginning of the season. I dither about the  pattern, I make at least two muslins after numerous fitting alterations.  I play with the details.  It's a  time consuming process.  This coat is my all time favorite of  coats that I've made. The fabric is a gorgeous mohair, wool and silk blend that I've in the collection more than a few years.  It was bought at one of Michael's online 50%off  sale .  If I remember correctly it's Zegna. It's fabulous. The mohair and silk make it light and airy while the wool gives it stability.  The lining is a silk charmeuse from one of  Fabric Mart's famous sales.  My inspiration was a Saint Laurent coat selling for over $2500. I had a Burda pattern that I'd made a muslin from. for a round necked coat. . I liked it because it had a shoulder princess line in front and a plain back.  I wanted a slightly oversize coat that would fit comfortably over a heavy sweater or two, and it does.  I've taken all of Suzy Furrer's classes, which are fabulous by the way, and used her neckline and collar class to change the plain front to a notched collar.  I change necklines, especially in knits, all the time but this was my first notched collar  and I am very pleased with it.  

I love  simple coats with something different that makes them stand out and here it's the oversize pockets.  I made several paper samples and I still ended up making them twice.  The coat also has bound buttonholes, my go to for coats.  I hadn't made them in awhile, so that meant lots of samples with some different methods. Judy Burlap's bound buttonhole instructions, available on her website, are some of the easiest, best I've used.  I made three buttonholes that  match and all of the lips are even. 

When I plan a coat I debate endlessly with myself about how much tailoring structure I really want in the coat.  For this one I wanted a light soft look and feel because the fabric is airy and light.  Allison Smith's class on Craftsy gave me the opportunity to try hybrid tailoring.  It's light but gave me just enough body for this coat.  I think that I am addicted to Craftsy classes!

 All in all I am very pleased with the coat, especially the fit.  I finally got the armscye and sleeve fit perfected.  I have a low right shoulder that has a bit different rotation than the left one due to an old injury, so while the left one will hang perfectly, the right one is a different story.  I learned that I need to rotate it more than the left one.  I also learned that my narrow shoulders need a higher sleeve cap. to hang perfectly. This I got from another Craftsy class, Lynda Maynard's fitting class.   I've had the shoulder problem for 34 years but age has changed it as it has the rest of my body. Learning to fit my aging body has sometimes been a challenge.


 Do you ever find that you have more ease in the front or back of a sleeve cap?  This
was one of  my problems.  I could feel the back of the cap against my shoulder.  The sleeve cap ease needed to be balanced.  I walked the front and back of my sleeve against the front and back of the coat armscye.  When I got to the shoulder point I marked it on my sleeve cap.  The ease needs to be the same on either side of the shoulder point on the sleeve cap.  I adjusted it by removing from the front and added to the back of the cap.  It really works.   I found this information in Sarah Veblen's Photographic Guide to Fitting.  I keep finding more and more useful information in that book. Because of my shoulder issue I still had to adjust the right sleeve cap a bit more than the left. It worked and as you can see in the photos there is no excess at the back or front of my cap. It's fits into the armscye perfectly.  The back of the coat looks a little big, but this is exactly how the original looked and it makes it easy to wear over heavy sweaters.  Here I'm just wearing it over a t shirt. 

The other thing I do to accommodate my uneven shoulders is to add to my right shoulder pad. I add padding and keep trying it on until both shoulders look even.  Then I use some tailor tacks to keep the layers together.  


I usually start with existing shoulder pads, especially if I want to use extended pads which are not easy to make yourself.  Apple Annie fabrics has some very nice shoulder pads that are a combination of set in and raglan. Years ago Threads had a series of articles on Armani tailoring and this is the  type of shoulder pad he uses.  Because my low point is really that my arm is lower, this really makes it easier to even up my shoulders. I add the padding to the end of the pad but not into the extension.  As you can see, it works well. It also fills out the sleeve cap. I didn't use a sleeve head.
The photos we took that showed the lining weren't great, so when I get a chance I'll take some new ones and post them.